Script Cmd: AUXCOM
AUXCOM [-p:t:] {OPEN | CLOSE | WRITE | DTRSET | DTRCLR | RTSSET | RTSCLR} [cmd-specific arguments]
AUXCOM OPEN {COM #} {baudrate} {datasize} {parity} {stop-bits} {flowctrl}
AUXCOM CLOSE {COM #}
AUXCOM WRITE {COM #} {string-to-send-to-port}
AUXCOM {DTRSET | DTRCLR | RTSSET | RTSCLR} {COM#}
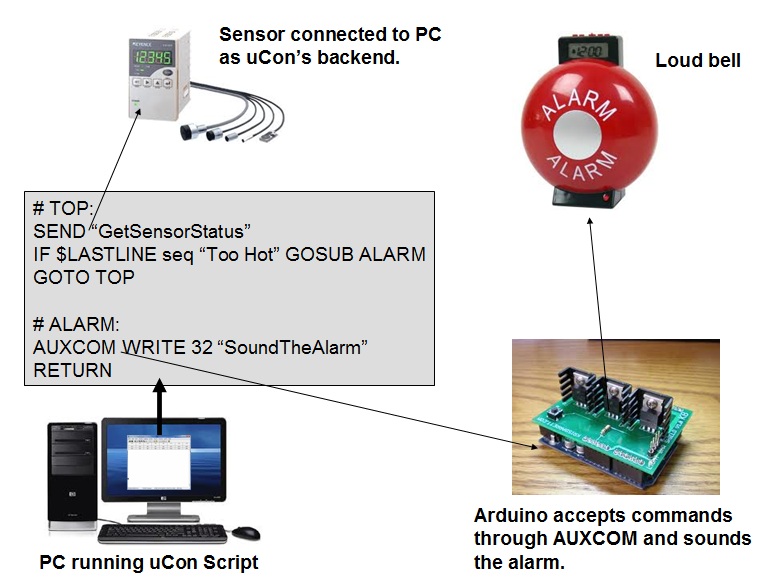
This command allows uCon to open additional COM ports (see note1 below) for varying degrees of coordinated interaction between uCon's backend connection (COM | TELNET | SSH) and devices AUXCOM connects to. The original intent of this command is to provide a uCon script with the ability to interface with another COM port on the PC that has an ARDUINO board running a simple command interpreter compatible with this interface (see example sketch below). This allows uCon to connect to its normal backend connection, but also have coordination with an ARDUINO board that can be customized to do whatever the user sees useful. The ease-of-use of the ARDUINO board(s) (http://www.arduino.cc) and the development environment that comes with it makes it an easy choice for building custom interfaces that can be controlled by this new command.
Here's a use case:
Imagine uCon's backend connected to a sensor. That sensor is monitoring some status, and the user would like to be made aware of that status change. A uCon script can be used to detect the alarm state (whatever that may be) and then within the same script, send a message to an ARDUINO board that can then turn on some alarm...
# Connect to Arduino device assumed to be on COM port 27:
AUXCOM OPEN 27 115200 8 NONE 1 NONE
ECHO OPENED!
SLEEP 1000 # Give the Arduino time to reset
GOSUB LED_BLINK
AUXCOM -p ARDUINO: WRITE 27 "test delay\n"
ECHO AUXLASTLINE: "$AUXLASTLINE"
AUXCOM WRITE 27 "test 12345\n"
ECHO AUXLASTLINE: "$AUXLASTLINE"
AUXCOM -p ARDUINO: WRITE 27 "test rain in spain\n"
ECHO AUXLASTLINE: "$AUXLASTLINE"
AUXCOM -p ARDUINO: WRITE 27 "test error\n"
ECHO AUXLASTLINE: "$AUXLASTLINE"
SLEEP 1000
AUXCOM CLOSE 27
EXIT
# LED_BLINK:
AUXCOM WRITE 27 "led-on\n"
SLEEP 1000
AUXCOM WRITE 27 "led-off\n"
SLEEP 1000
RETURN
The output of this script follows:OPENED!
AUXLASTLINE: test delay
AUXLASTLINE: test delay
AUXLASTLINE: rain in spain
AUXLASTLINE: ERROR
There are several seconds of delay after the OPENED! message because the LED_BLINK subroutine takes 4 seconds and the code in ARDUINO that responds to "test delay" will delay for 5 seconds. The important thing to note is that if you have an arduino board attached to this (running the skeleton sketch below), then you'll see that the uCon script toggled the LED, then issued the "test delay" and waited for the response.
Here's the skeleton ARDUINO sketch that works with the above uCon script. This can be cut-n-pasted directly into an ARDUINO sketch as-is:
// cmd_proc:
// Basic command line processor skeleton intended for Arduino applications
// that will interface with uCon scripts.
//
// Pin 13 has an LED connected on most Arduino boards.
// give it a name:
#define LED 13
#define TURN_LED_ON() digitalWrite(LED, HIGH)
#define TURN_LED_OFF() digitalWrite(LED,LOW)
#define PRINT_PROMPT() Serial.print("ARDUINO:");
#define PRINT_OK() Serial.println("OK");
#define PRINT_ERR() Serial.println("ERROR");
#define CMD_SUCCESS 1
#define ERR_UNKNOWN_COMMAND -1
#define ERR_BAD_CMD_PARAM -2
int cmdidx;
char cmdbuf[64];
struct cmdinfo {
char
*name;
/* Name of command seen by user. */
int (*func)(char *); /* Called when command is invoked. */
};
int cmd_ledon(char *line);
int cmd_ledoff(char *line);
int cmd_help(char *line);
int cmd_test(char *line);
struct cmdinfo cmdtbl[] = {
{ "led-on", cmd_ledon },
{ "led-off", cmd_ledoff },
{ "test", cmd_test },
{ "help", cmd_help },
{ 0,0 }
};
//////////////////////////////////////////////////////////////////
//
// Command functions as they are listed in the command table above:
//
int
cmd_ledon(char *line)
{
TURN_LED_ON();
return(CMD_SUCCESS);
}
int
cmd_ledoff(char *line)
{
TURN_LED_OFF();
return(CMD_SUCCESS);
}
int
cmd_test(char *line)
{
if (strlen(line) > 5) {
if (strcmp(line+5,"delay") == 0)
delay(5000);
else if (strcmp(line+5,"error") == 0)
return(ERR_BAD_CMD_PARAM);
else
Serial.println(line+5);
}
return(CMD_SUCCESS);
}
int
cmd_help(char *line)
{
struct cmdinfo *cip = cmdtbl;
Serial.println("Commands:");
while(cip->name) {
Serial.print(" ");
Serial.println(cip->name);
cip++;
}
return(CMD_SUCCESS);
}
//////////////////////////////////////////////////////////////////
void
initCmdBuf()
{
cmdidx = 0;
memset(cmdbuf,0,sizeof(cmdbuf));
}
int
processCmdLine(char *line)
{
struct cmdinfo *cip = cmdtbl;
while(cip->name) {
if (strncmp(cip->name,line,strlen(cip->name)) == 0)
return(cip->func(line));
cip++;
}
return(ERR_UNKNOWN_COMMAND);
}
void
processIncomingChar(int ic)
{
if ((ic == '\r') || (ic == '\n'))
{
Serial.println();
if (cmdidx > 0) {
int rc = processCmdLine(cmdbuf);
switch(rc) {
case CMD_SUCCESS:
break;
case ERR_UNKNOWN_COMMAND:
case ERR_BAD_CMD_PARAM:
PRINT_ERR();
break;
}
}
PRINT_PROMPT();
initCmdBuf();
}
else if (ic == '\b')
{
if (cmdidx > 0) {
cmdidx--;
Serial.print("\b \b");
}
}
else
{
if (cmdidx < (sizeof(cmdbuf)-1)) {
cmdbuf[cmdidx++] = (char)ic;
Serial.print((char)ic);
}
}
}
// the setup routine runs once when you press reset:
void setup() {
// Initialize the serial port.
Serial.begin(115200);
while (!Serial);
// initialize the digital pin as an output.
pinMode(LED, OUTPUT);
// initialize command buffer.
initCmdBuf();
Serial.println("SYSTEM STARTUP MESSAGE HERE");
PRINT_PROMPT();
}
// the loop routine runs over and over again forever:
void loop() {
if (Serial.available() <= 0)
return;
processIncomingChar(Serial.read());
}